
WRITTEN BY: HARRIE PHILLIPS
PGCertClinEd, BAdVocEd (VocEd&Trng), RVN, DipVN (Surgical, ECC), DipTAE (Development & Design), DipBus, TAA, MACE

Packaging is a very important step in the sterile supply cycle and requires careful attention. If incorrect packaging or packaging technique is used, instruments cannot be considered sterile and ready for use, or they may become damaged during the sterilisation process.After initial cleaning instruments, trays and packaging materials need to be handled in an area that is low dust and low traffic to prevent contaminating particles from being packaged up with the instruments. This is why a packaging workstation should be designed in such a way that the work can be done efficiently and away from the “dirty” cleaning area.
A wide range of materials is available for packaging sterile supplies. Traditionally, packaging materials for sterile supplies were reusable, such as sterilising drums and cotton/linen. However, due to their inadequate microbial barrier, most of these traditional materials no longer meet the requirements for primary sterile packaging. They may still play a role as mechanical protection or an additional dust protection layer. In the veterinary clinic, it’s common to see a combination of textiles, non-wovens, laminated film pouches and paper bags as main packaging materials.
Traditional green theatre linen is not suitable for packing surgical kits. The openings between the threads are larger than most micro-organisms and thus the fabric does not provide an adequate microbial barrier.
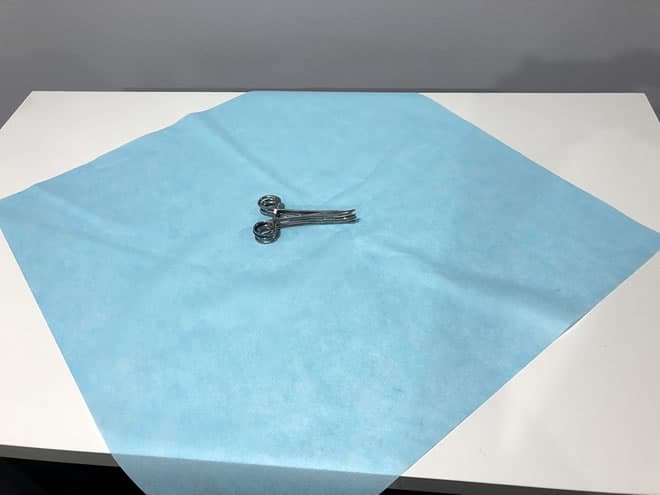
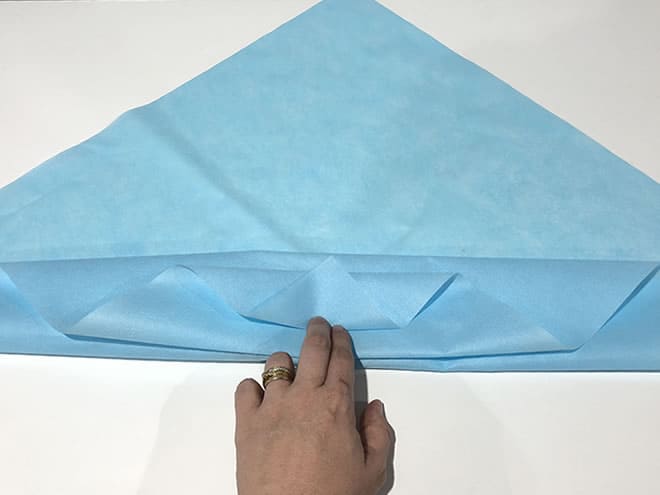
ENVELOPE FOLD METHOD FOR KIT WRAPPING
1.
Place kit in the centre of the drape, which is diagonally laid.
2.
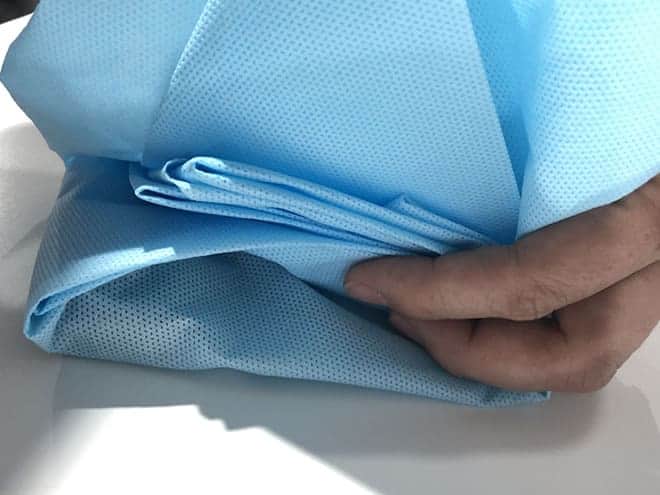
Concertina fold the bottom of the drape back over the kit, covering it completely. Continue until the drape no longer hangs over, ensuring that the corner points into the centre of the pack.
When unwrapped, the drape is pulled from the leading edge, and not the tip. This ensures the opener is only touching the underside of the wrap.
3.
Concertina the side of the drape, applying the same principles as Step 2.
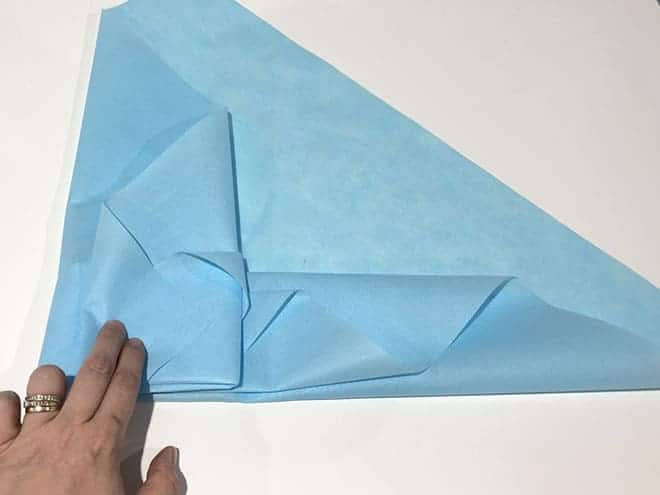
4.
Repeat for the other side.
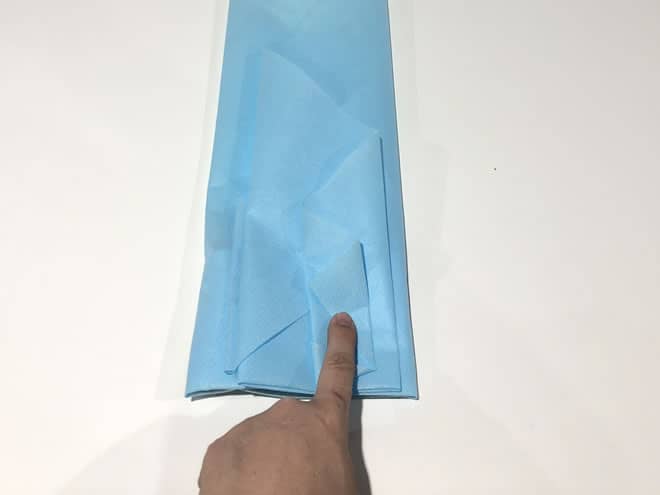
5.
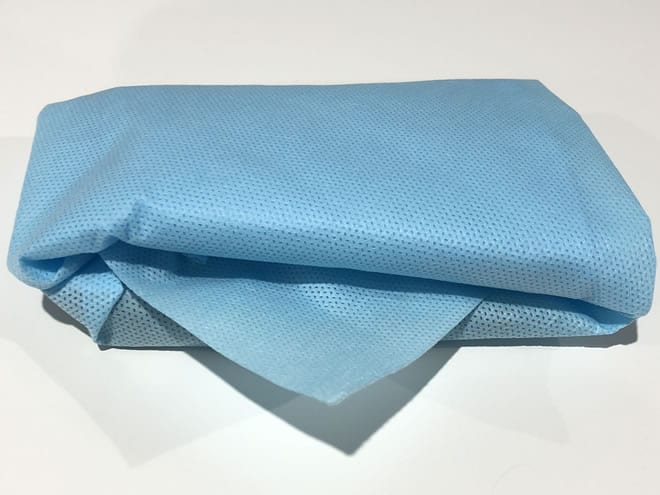
Fold the top of the drape over the whole kit, ensuring the inner layers do not move out of place.
6.
Tuck the remaining side of the drape in and under the previously folded layers. This secures the drape. Leave the tip out for easy opening.
Your drape should be firm (not loose as it can trap air) but not so firm that it may rip under the pressure when in the autoclave.
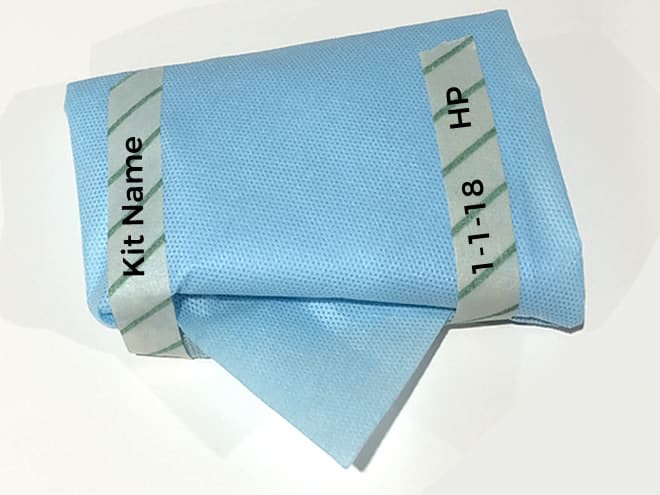
Secure with tape.
Autoclave tape is the recommended closure for wrapped sets. Masking tape should never be used because it was not intended to be sterilised and will not differentiate a set that has been in a steriliser from one that has not. Use as little tape as possible so the end user can easily get into the package; excessive tape can hamper correct opening of the kit. Not enough tape may allow the set to open up prematurely.
7.
Whenever an item is packaged, it should be identified with the name of the kit/device and the initials of the preparer. The date and autoclave cycle number (if available) should be written on the package prior to loading into the autoclave. This helps to track quality issues, as well as identify other kits that may have been in the same cycle. Instruments sterilised in the same cycle as instruments used in a surgery that developed post-surgery complications, like an infection, can then be identified, pulled from service and reprocessed.
When labelling wrapped kits and paper bags, writing should always be done on autoclave tape, not on the packaging material. Non-toxic markers that will not bleed or smear are to be used. Lead pencils or ball point pens are not recommended as they perforate the packaging material and may also contain toxins which can be transferred to the patient.
want to learn more?
INSTRUMENT CARE & STERILE SUPPLY
SHORT COURSE
Get the right information for instrument handling and processing to ensure your clinic is processing these vital tools in line with the Australian Standards and best practice recommendations. Surgical Instruments are expensive and it’s common to see bad or outdated practices in the clinic that can negatively affect the life of the instruments as well as sterility. Whilst it may sound basic, it’s not! You’ll learn how to process instruments correctly, pack, wrap and autoclave kits to ensure their sterility and learn appropriate storage processes. Remember, sterility has nothing to do with time, it’s about events.
Check it out