
WRITTEN BY: HARRIE PHILLIPS
PGCertClinEd, BAdVocEd (VocEd&Trng), DipVN (Surgical, ECC), DipBus, DipTAE (Development & Design), TAA
PUBLISHED: 7 MARCH 2018
REVIEWED/ UPDATED: 8 OCT 2025

Skin preparation techniques are one of our first defences in reducing the risk of our surgical patients developing a post-operative infection. Primarily the domain of the veterinary nurse, correct technique is essential to ensure efficacy.
This article will discuss solutions and techniques for veterinary surgical skin preparation, post clipping.
There is a variety of methods, solutions, and techniques in use in veterinary clinics today. They won’t always match what I discuss below, but this does not mean the method is wrong. If they follow the same principles and are using the correct dilution and contact time of the antiseptic solutions, then continue.
It has been noted by many studies, some cited below, that most clinics however do have room for improvement in their skin preparation protocols. It’s quite common for inadequacies in technique to be perpetuated through the standard new staff onboarding process. It’s also common for standard every day protocols to not keep up with current recommendations. We spend more time learning about the cool, new stuff. It’s more interesting after all.
This article aims to help veterinary nurses update their clinic’s surgical skin preparation protocols, backed up with evidence.
The ‘skin prep’ is used to reduce the amount of transient organisms found on the skin, as well as soil from the dermal surface1. We achieve this not only by the antiseptic action of the surgical scrub solution we use, but through the mechanical action of performing the ‘scrub’ itself.
WHAT ANTISEPTIC SOLUTIONS SHOULD I USE?
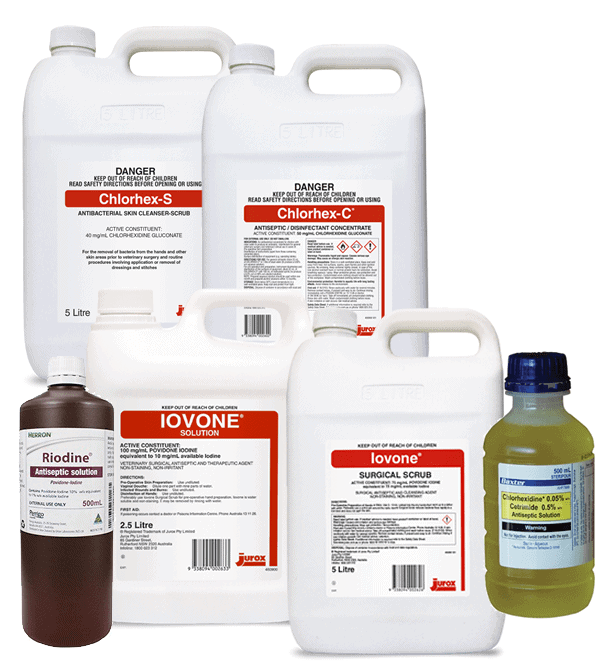
What antiseptic solutions you use will depend on what your clinic has available. Most clinics will either use a chlorhexidine gluconate solution or a povidone-iodine solution. Whichever one you use, there is some evidence to suggest that it is important to not mix the two on the same patient – don’t use chlorhexidine gluconate for your initial prep and then povidone-iodine for the final prep. The chemical structure of these two chemicals have been suggested by some to be incompatible. Chlorhexidine gluconate is cationic (positively charged ion) and povidone-iodine is anionic (negatively charged ion) which together are chemically unsuited. There is some concern that when used together, they may provide limited or no skin antisepsis as the iodine inactivates the chlorhexidine 2, 6, 7, 8. That said, there is emerging evidence suggesting that sequential use of these two antiseptic agents may further reduce risk of surgical site infections11, 12. For now though, until there is a consensus, stick with one or the other. The vast majority of chlorhexidine manufacturers recommend to not use the two together due to the possible incompatibility.
What’s better – chlorhexidine or iodine?
Many studies have been conducted on whether chlorhexidine gluconate is superior to povidone-iodine, with an array of results supporting both sides. Chlorhexidine gluconate is often considered superior to povidone-iodine because of its longer residual action3. If you perform a correct surgical skin prep routine and maintain asepsis, using either solution is fine. If using povidone-iodine, remember it has a longer contact time than chlorhexidine gluconate, so adjust your ‘scrub’ timings (contact time) to suit.
Povidone-iodine has been shown to have a higher incidence of acute contact dermatitis in canines compared to skin preparations using chlorhexidine4, and this may be factored into your clinics choice of surgical preparation solution. Povidone-iodine should always be used for any ophthalmic surgical procedure preparation.
CONTACT TIME & DILUTIONS
Many veterinary nurses are not familiar with the correct contact time for their products. In addition, many clinics do not use the correct dilution for maximum antisepsis. Either of these factors may affect the level of antisepsis provided2.
It is important to read the manufacturer’s instructions for both dilution ratios and contact time of all skin antiseptic solutions. Contact time can vary depending on the dilution used. Remember, for any chemical, the go to documentation on how to use the chemical correctly and safely should be the manufacturer’s instructions. Same goes for equipment.
Contact time is often overlooked – especially when we’re busy or it’s a routine surgery. Using the appropriate contact time is an essential part of the skin preparation process to ensure the best skin antisepsis has occurred.
The dilution ratio will depend on the initial concentration of your antiseptic, and therefore it is impossible to give you a guideline in this article that covers all available solutions.
When unsure, the rule of thumb is to leave the solutions on for at least 5 minutes and remember iodine needs longer than chlorhexidine.
Should we use alcohol?
Yes! Alcohol is a proven powerful antiseptic. Alcohol, when added to either chlorhexidine gluconate or povidone-iodine, is considered to be the agent providing the majority of the antiseptic properties5.
If your clinic is not currently utilising alcohol as part of the skin preparation routine, then it’s addition should be considered.
Alcohol should always be used in a diluted state (with water) as denaturing of proteins does not easily occur in the absence of water. Most guidelines state a 70% alcohol concentration.
Important Notes on making up your solutions.
Many veterinary clinics will make up their skin preparation solutions in bulk for use across the day, or week. This is a practice that has no evidence to back up as safe and plenty of evidence that it may be contributing to antimicrobial resistance. Best practice is to make up the solution fresh for each and every patient.
Contaminated chlorhexidine has been linked to multiple hospital acquired infections. This has been linked to the practices of using contaminated water and the reusing of bottles with decanted solutions without adequate cleaning and disinfection between refills. Most these outbreaks were linked to solutions containing chlorhexidine 2%, however up to 4% solution was also involved10. Given that many clinics dilute their chlorhexidine to 2% and below, it is an issue that requires consideration. This same consideration should be given to all instances of the use of chlorhexidine in clinic, and not just particular to skin preparation.
Do not make up solutions in bulk and use across the day’s (or weeks) surgical load.
WHAT ANTISEPTIC SOLUTIONS SHOULD I USE?
This depends on the types of surgeries you perform, the availability of solutions, costs, surgeons preference, and staff allergies.
Common Solutions & Dilutions
This is not an exhaustive list and is provided for reference only. While other concentrations of Chlorhexidine Gluconate exist (eg, Hexacon 5%), the majority of preparations are 4%. This will alter dilution rates. Please refer to the manufacturer of the solutions you are using for their recommended dilution.
Initial Skin Decontamination (step 1)
This is the soaping sudsy antiseptic scrub. Most manufacturers say to use undiluted.
According to the manufacturers, chlorhexidine 4% scrub should be used undiluted, with just a small amount of water added to facilitate lathering. This is backed up with much evidence where the studies are completed using chlorhexidine 4% to review efficacy. It is common practice for clinics to dilute chlorhexidine with an equal part of water (so a 1 to 1 ratio) to a 2% solution and some clinics will dilute even further. There is mounting evidence that we should not be diluting chlorhexidine below 4% due to an increase in the number of resistant bacteria. Swales & Cogan (2017) completed a small-scale study looking at chlorhexidine as part of veterinary patients’ skin prep and found that 40% of the bacteria strains isolated after the skin prep were resistant to chlorhexidine. The contact time for chlorhexidine is generally considered to be 5 minutes, however studies have shown that 2, 3 and 4-minute scrub times could be as effective, but more evidence is needed.9
Used for Rinse (step 2) Final Skin Prep (step 3)
This is the non-soapy one. Mostly, this is mixed with alcohol and used for both the rinse (step 2) and the final skin prep. If mixing to make a 500mL chlorhex/meths mix, take 20mLs of chlorhexidine 4% solution, 75mLs water and top up with alcohol to make a total of 500mLs. Remember that different dilution rates apply if using a 5% solution.
0.05% Solution
Often used as a ‘weak’ solution for heavily contaminated wounds or for preparation of the prepuce or vulva for urinary catheterisation. It can be quite irritant to mucous membranes.
To make up a 0.05% solution using the Chlorhexidine 5% solution, you use a dilution of 1:100. That’s 1mL of Chlorhexidine to 99 mLs of water.
For 4% solution, 1mL CHG to 79mL water; CHG 2% is 1mL CHG to 39mL water.
Initial skin decontamination (step 1)
Povidone Iodine concentrations can vary between manufacturers and countries.
The most common in Australia is 7.5% scrub solution. Again, as this is a scrub, it’s the soapy one. Depending on the manufacturer’s instructions, it varies from undiluted to an equal mix of water to scrub solution.
This should not be diluted, and is generally used for the final prep (step 3).
Ophthalmic Prep or Wounds
This can be bought pre-made up, or you can make up your own 1% solution with 10mLs of povidone iodine to 90mLs of water.
Initial Skin Decontamination (Step 1)
This can come pre-made so you don’t need to dilute, or a concentrated form which requires 60-90mLs of solution into 1-1.5L of water. Check the manufacturer’s instructions.
Never use this product on eyes or mucous membranes as it is extremely irritant.
Rinse (step 2)
Surgical methylated spirits should always be used at around a 70% dilution. Some comes pre-prepared, other brands you need to make up yourself. To do this,
you need 70mLs of alcohol to 30mLs of water.
Never use on open wounds, eyes, or mucous membranes.
WHAT IS THE BEST PRACTICE PROTOCOL FOR SURGICAL SKIN PREPARATION?
You should think about your skin preparation for surgery as a three-step process. The first removes the visual organic material (initial decontamination), much the same as humans having a shower with an antiseptic soap prior to their surgery; however our patients are anaesthetised to facilitate this. The second is to rinse the site (usually alcohol based), and the final is the skin paint – performed just before the surgery.
Step 1 – Removal of visual organic material (AKA The ‘Scrub’)
When you perform the skin preparation, it is important that you wear exam gloves to limit any contamination from your hands contacting with the surgical area. They will also protect you from the constant use of the chemicals, which can dry out your skin.
For every patient, make up fresh skin preparation solution using the ‘scrub’ version. This is the version of the antiseptic solution that contains a detergent base and will suds up when used.
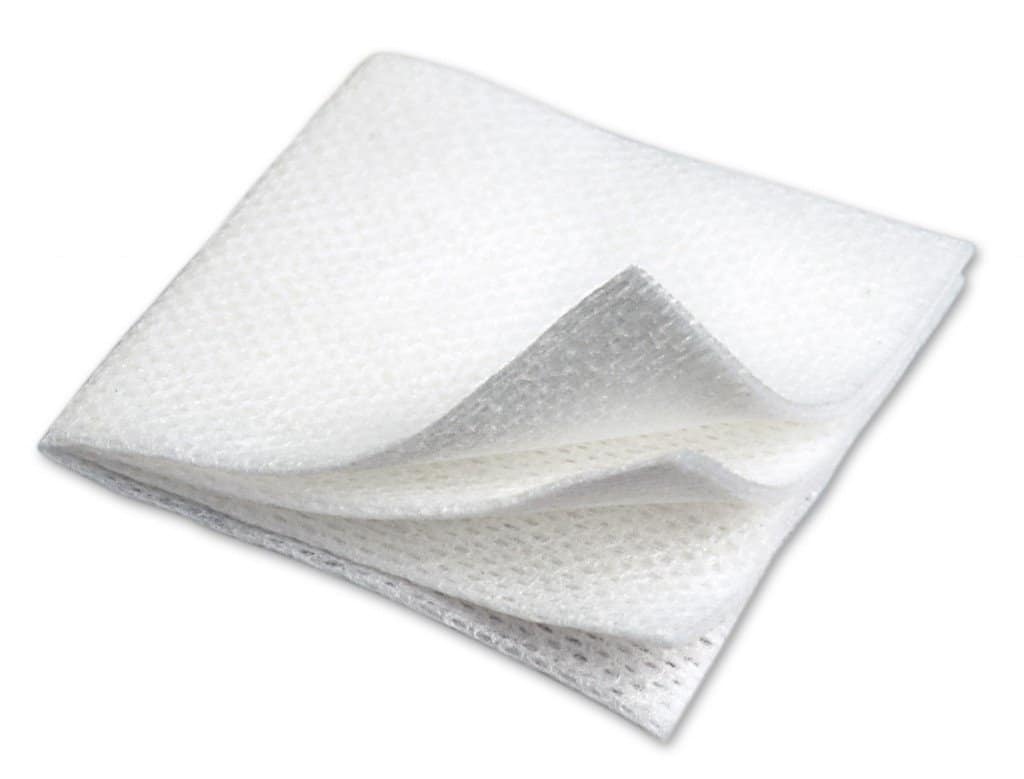
Use non-linting soft gauze swabs, as the linting version will leave particles on the surgical site and these are considered a form of contamination. Non-woven swabs are a better choice than traditional woven swabs, as they are gentler on the skin. Some veterinarians and nurses prefer to use cotton wool as it’s less abrasive. This should be balled up to minimise fibres from being left on the skin. It, however, will still leave some fibres, and therefore contamination.
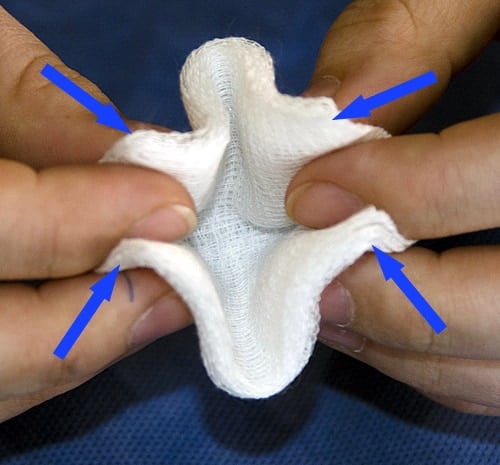
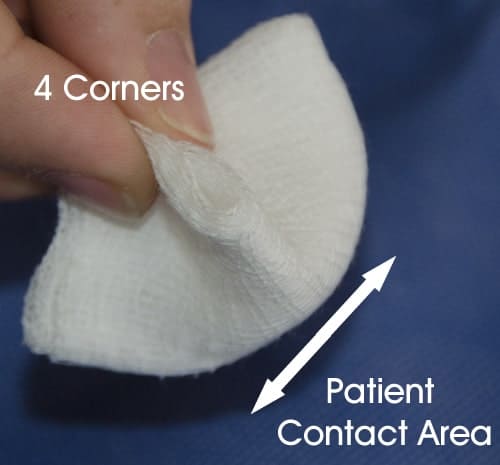
When using gauze swabs, they should be folded into quarters by bringing the four corners together and held by the corners. This produces a smaller contact area that is easier to control and limits the chance of your fingers touching the patient.
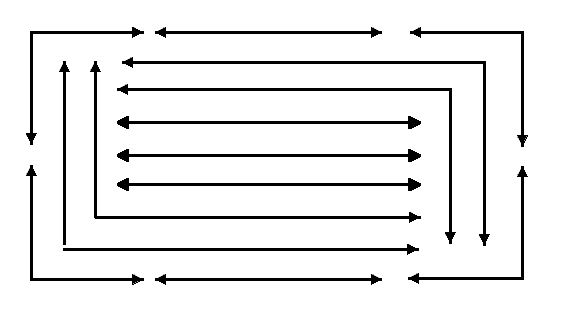
Starting at the proposed incision site, move the gauze back and forth for approximately 15 seconds. It’s the back and forth action that provide most the cleaning. Discard your swab and grab a new one. Gradually move your way out from the incision, keeping that back and forth action going, changing swabs regularly. Never return a dirty swab back to the incision site. Using a pattern of L and C shapes will let you keep the back and forth action going, whilst enabling you to work your way from the centre out.
Wiping in a single direction (aka ‘target or bullseye’ pattern, also called a concentric pattern) will not have the same mechanical action, so it is less effective than the back and forth motion.
Excessive pressure is not necessary and will abrade the skin, causing inflammation and the wound may be more prone to healing complications if the dermal layer is compromised. It will also cause the native skin microbes to raise to the surface.
Once the fur or any other dirty or contaminated area has been touched with the gauze, the gauze must never return to the incision site or get placed into the scrub solution. Discard each swab if contaminated, or when you reach the fur line.
Repeat the process until a visible significant reduction in, or complete removal of all visible organic material from the prepared area is achieved. This will generally be a minimum of three passes over each site/area on the average patient.
NON-WOVEN GAUZE
4 CORNER HOLD
SCRUB PATTERN
Step 2 – ‘The Rinse’
After the removal of visual organic material, the surgical site should be rinsed with 70% isopropyl alcohol or sterile saline. Sterile saline does not have any antimicrobial activity and therefore, unless contraindicated, 70% alcohol should be used as the rinsing agent. This can be in combination with your chosen antiseptic solution. It’s very common to see clinics using a chlorhex/meths mix. Chlorhexidine should not be added to saline however, as precipitation and particles can form.
Using 70% alcohol provides an instant bacterial kill, defatting of the skin and removal of the detergent, whereas saline will only rinse the scrub solution off. Sterile saline however is used for mucous membranes, or open wounds.
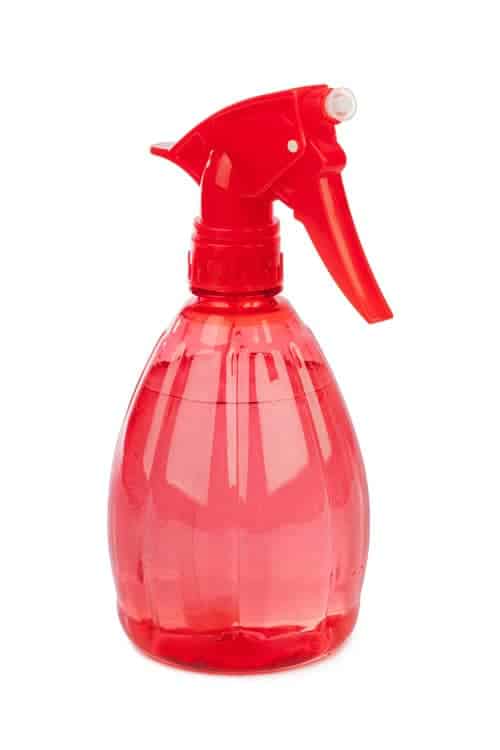
The rinse can be achieved via spraying or by wiping with rinse agent soaked swabs using the same target pattern as the initial scrub. Using the swabs is considered a more controlled method, and ensures excess rinsing agent is kept to a minimum. This is extremely important when using 70% alcohol, as allowing alcohol to pool under the patient or saturate the fur can cause thermal burns if an electrocautery unit is used.
Alcohol also evaporates quickly, and whilst this lets us speed up the preparation process, it also has a cooling affect and can considerably contribute to patient hypothermia.
The rinse step should be repeated until all traces of the suds from the scrub have been removed, and the swabs are coming off clean. Once again, this is usually around three passes.
Step 3 – Final ‘Skin Paint’
The last step is to perform a final coat of antiseptic solution on the skin (make sure it is the solution and not the scrub version). This can be achieved either by spraying with a spray bottle or wiping over using the same target patterning. If spraying, squirt the first spray into the kick bucket to remove any micro-organisms or debris from the nozzle. You should also aim the nozzle so the spray does not pass through the hair prior to the area you have prepped – otherwise you can ‘blow’ microorganisms back onto your freshly prepped area.
If using chlorhexidine gluconate for step one, then use a chlorhex/meths mix (0.5% chlorhexidine gluconate/70% alcohol) or chlorhexidine 0.2% (diluted with distilled water) to perform the final skin paint. A combination of chlorhexidine gluconate/70% alcohol is commonly used, as alcohol enhances the residual microbial effect that chlorhexidine has.
If using povidone-iodine, use the povidone-iodine solution and not scrub. Do not dilute if you are using the standard 7.5 to 12% solution.
This final skin paint is applied just before patient transfer to theatre and again after transfer and positioning in theatre.
As it is virtually impossible to keep the surgical site from getting contaminated during the transfer to theatre, the scrub and rinse steps should be repeated again once positioned in theatre to ensure the surgical site is as clean as possible, especially for orthopaedic procedures, and then followed by the skin paint.
Some veterinary surgeons prefer the final skin paint in theatre to be performed with sterile swabs, and sterile gloves or swab holding forceps, especially for lengthy or orthopaedic procedures.
References
1. AORN. Standards, Recommended Practices, and Guidelines. Denver: AORN, 2006.
2. The efficacy of chlorhexidine gluconate in canine skin preparation – practice survey and clinical trials. Evans LKM, Knowles TG, Werrett G, Holt PE. Journal of Small Animal Practice. Volume 50, Issue 9, pages 458–465, September 2009
3. A comparison of the use of povidone-iodine and chlorhexidine in the prophylaxis. Berry A, Watt B, Goldacre M, Thomson J, McNair T. Journal of Hospital Infection 1982;3(1):55-63.
4. Comparison of Three Skin Preparation Techniques Part 1: Clinical Trial in 100 Dogs. Osuna DJ, Deyoung DJ, Walker RL. Veterinary Surgery. Volume 19, Issue 1, pages 14-19, January 1990
5. Guideline for prevention of surgical site infection, 1999. Hospital Infection Control Practices Advisory Committee. Mangram AJ, Horan TC, Pearson ML, Silver LC, Jarvis WR. Infect Control Hosp Epidemiol 1999; 20: 250–278.
6. Prevention of perioperative infection.Fletcher, N., Sofinos, D., Berkes, M.B., Obremsky, W.T. (2007) Journal of Bone and Joint Surgery, 89 (7), 1605-18
7. Chlorhexidine: Expanding the armamentarium for infection control and prevention. Milstone, A.M., Passaretti, C.L., Perl, T.M. (2008) Clinical Infectious Diseases, 46, 274-281.
8. Chlorhexidine’s complications. Sivathasan, N., Vijayarajan, L. (2010) Journal for Perioperative Practice, 20(8), 300-1
9. Efficacy of Mechanical versus Non-Mechanical Sterile Preoperative Skin Preparation With Chlorhexidine Gluconate 4% Solution. Davids, B., Davidson, M.J., TenBroeck, S.H., Colahan,P.T. , & Oli, M.W. (2015). Veterinary Surgery, 44,648–652
10. Outbreaks associated with contaminated antiseptics and disinfectants. Weber, D.J., Rutala, W.A., & Sickbert-Bennett, E.E. (2007) Antimicrob Agents Chemother, 51(12),4217-24.
11. Sequential use of povidone-iodine and chlorhexidine for cutaneous antisepsis: A systematic review. Mermel, L.A. (2020) Infection Control & Hospital Epidemiology, 41(1), pp. 98–101.
12. Does chlorhexidine and povidone-iodine preoperative antisepsis reduce surgical site infection in cranial neurosurgery? Davies B.M., Patel H.C. (2016) Ann R Coll Surg Engl., 98(6):405-408.
want to learn more?
SURGICAL NURSING
SHORT COURSE
Starting with admission and documentation requirements, you’ll soon dive into the more fun aspects such as patient and surgical skin preparation. You’ll learn about theatre attire and etiquette, setting up and proper cleaning of theatre, suture materials and intraoperative tasks. This course will ensure you have the right underpinning knowledge to work as a surgical nurse in your clinic and be helpful to the vet whilst providing amazing patient care. You’ll cover the basics of scrubbing in to assist and learn about a lot of different surgical procedures and their requirements such as orthopaedic, abdominal, ophthalmic and others.
Check it out
Cite this article
APA: Phillips, H. (2018). Surgical skin preparation – best practice protocol for veterinary nurses. Australian College of Veterinary Nursing. https://vetnurse.com.au/2025/10/23/surgical-skin-preparation/
Vancouver: Phillips H. Surgical skin preparation – best practice protocol for veterinary nurses [Internet]. Australian College of Veterinary Nursing; 2018 Mar 7. Available from: https://vetnurse.com.au/2025/10/23/surgical-skin-preparation/
BibTeX:
@article{phillips2018surgicalskin,
  author  = {Phillips, Harrie},
  title   = {Surgical skin preparation -- best practice protocol for veterinary nurses},
  journal = {Australian College of Veterinary Nursing},
  year    = {2018},
  url     = {https://vetnurse.com.au/2025/10/23/surgical-skin-preparation/}
}