
WRITTEN BY: HARRIE PHILLIPS
PGCertClinEd, BAdVocEd (VocEd&Trng), DipVN (Surgical, ECC), DipBus, DipTAE (Development & Design), TAA
PUBLISHED: 7 MARCH 2018
REVIEWED/ UPDATED: 15 OCT 2025

Intravenous (IV) catheters (the correct term is ‘cannula’) provide a pathway into the vascular system for fluid, blood products or medication administration and allow multiple blood samples to be drawn with minimal patient discomfort. They are most commonly used to administer drugs and fluid therapy; however they can also be used to provide nutritional support directly into the venous system. IV catheters can also help facilitate blood collection in animals with poor veins, or who need multiple samples to be taken.
As the catheter is introduced directly into the venous system, it must be placed in an aseptic manner to help prevent sepsis and other complications
Strict aseptic technique must be followed for every catheter, even if they are only indwelling for a short time.
Ensure you wash your hands before assisting with catheter placement.
When taking blood from a patient, it is desirable to take blood from the jugular vein where possible. This helps limit scarring of the peripheral veins, which can hinder IV catheter placement. Remembering this little tip can make a huge difference when you need to place an IV catheter in a critical care or emergency patient with very ‘flat’ veins.
HERE’S THE PROCEDURE FOR PLACING A PERIPHERAL INTRAVENOUS CATHETER
1. Select an appropriate vein
Peripheral indwelling IV catheters are most commonly placed in the cephalic vein in dogs and cats. In the hind limb, they are most commonly placed in the lateral saphenous vein. Other veins used often for catheterisation include the accessory cephalic, and medial saphenous.
Think about your patient, their reason for hospitalisation, and their status. If they are having surgery on their right forelimb, then it’s probably not the right choice for catheter placement! If they are vomiting, it will be easier to keep a saphenous catheter clean and dry, conversely, if they have diarrhoea, then you want a cephalic. It will make your life easier.
2. Size
“Go big or go home” is often chanted, or vets and nurses happily reach for a 22g catheter every time, regardless of patient size. Realistically, you want the largest catheter you can comfortably place in your patient, that will do the job necessary. No bigger, no smaller. If your catheter is too large, it can occlude the vein or even cause trauma.
Most dogs will easily take a 20g, larger dogs, and 18g. Cats are fine with a 22g. If you are infusing fluids are a high rate, you want a larger bore catheter, rather than a smaller one. Your fluid pump will be quieter!
Length also plays a part. Catheters come in different lengths. Generally speaking, longer catheters are more stable. However, you don’t want to go placing a 1 1/2″ catheter in a dachshund – those twee legs are better off with a 3/4″ length. Otherwise, your fluid pump will constantly remind you it’s there.

3. Skin & Personnel Preparation
I cannot stress how important proper skin preparation is. The catheter is a portal from the dirty outside world, straight into the bloodstream!
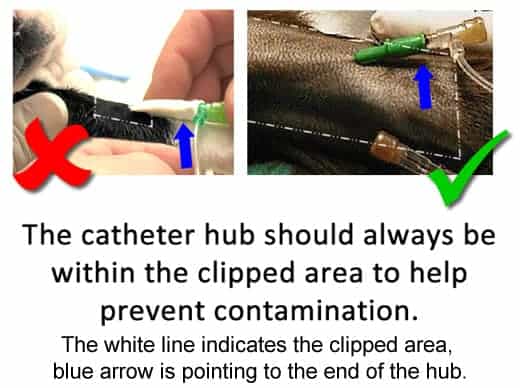
Hair should be clipped large enough that the entire catheter hub, connections and of course insertion site, are hair free. This may be longer than you were expecting.
All intravenous catheters should be placed using the same skin preparation techniques we use for surgery. Contact time is just as important here as it is for surgical skin prep. A quick wipe over with chlorhex/meths is not adequate.
It is extremely important to ensure you wash your hands before placing the catheter, and always use good aseptic technique when handling the equipment and placing the catheter. Catheter borne infections have been shown in some studies to be prevalent in around 25% of veterinary critical care patients3 and approximately 15% of hospitalised patients in the general clinical setting4.
You should also wear exam gloves as you are in contact with blood, at least until the catheter is placed and the hub is capped off. You can remove your gloves to place the tape, if there is not excess blood around.
4. The assistant is just as important as the placer
If you are asked to help place a catheter, as the assistant it is your job to restrain the patient. Generally, you will do this with the patient in sternal recumbency and you will hold out the leg that the catheter is going in.
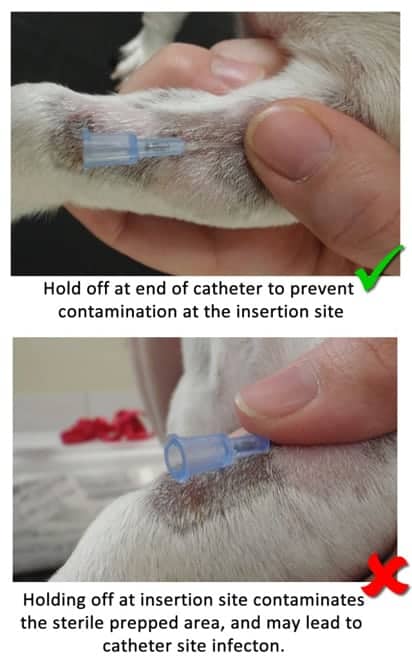
It is also the job of the assistant to ‘roll’ the vein to raise it, allowing for with easier catheter insertion. Once the catheter is inserted it will be your job to ‘hold off’ the catheter by placing your thumb at the end (not the insertion site!) of the catheter. This stops the blood from flowing everywhere whilst the person placing the catheter connects the giving set/IV port and tapes it all in place.
5. Place your catheter
Get your assistant to hold up the vein by rolling their thumb from medial to lateral. (A tourniquet can be used for difficult veins).
Insert the catheter into the vein, until you see a blood ‘flash–back’ in the stylet. Advance the catheter & stylet together a little more, then push off the catheter, holding the stylet to prevent it from going further into the vein.
If you try to advance the catheter off at the first sign of blood, you may run into issues as the catheter itself may still lie outside the vein. That little extra advance before pushing off helps ensure the catheter tip is located within the vein.
B. Braun Introcan Safety IV Catheter demonstrating what happens internally when you insert a IV catheter (cannula).
It is important not to touch the insertion area or end of the catheter hub. I prefer catheters that have a little tab on the hub. This makes advancing them without touching the hub end easier.
You should never ‘flick’ off the catheter with your fingernail against the hub end. This will contaminate it. Instead, you should carefully hold either side of the hub to advance it in. Careful not to touch the base of the catheter or the hub end.
Ask your assistant to ‘hold off’ the catheter. Remember this is by placing their thumb at the end (not the insertion site!) of the catheter. Place the IV injection port on the catheter hub. Alternatively, you can use the cap end of the stylet (not the stylet itself) to block the hub if you are placing the patient straight onto fluids.
6. Secure & Flush
There are so many different ways to tape. Whatever method you decide, it has to do two things.
- Hold the catheter securely. We don’t want it moving, twisting, or falling out.
- Be removable. No one wants a bad wax job. Nor does anyone want to chance their life removing that last piece of tape.
While standard IV catheter placements generally don’t incorporate a transparent film dressing like we would for a sterile IV catheter placement, it is worthwhile pointing out that there is good evidence to show that including one greatly reduces the incidence of complications5. If you choose to use one, this is the stage at which you would apply it.
Select an elastic tape, around 1″ in diameter. These are generally easier to remove than the rigid versions, yet still hold securely.
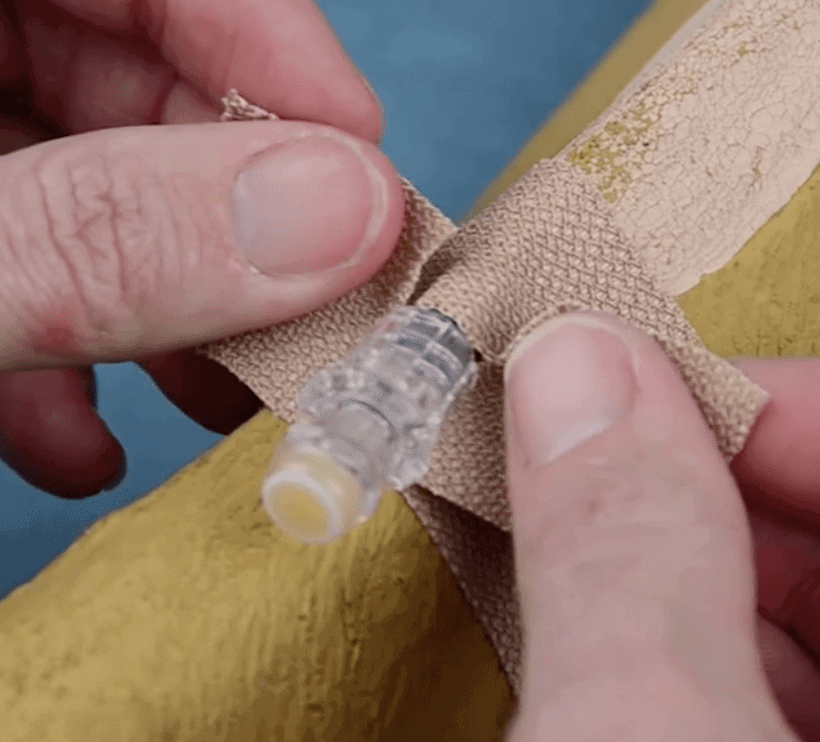
Pass a piece of tape under the catheter hub, winding it around the leg and passing over the hub to secure it to the leg. Under, then over, over then under, it’s all much of muchness security wise. I prefer to start my taping under the catheter, purely to place a clean layer under the hub, and in my opinion, the tape that then goes over the catheter holds more securely to itself.
I also prefer to place a V shaped piece up under the catheter as my second piece of tape. This provides some extra side to side stability.
Either before I place the V piece, or straight after, I flush my catheter to check patency and that I’m in. I like to have that initial piece of tape in place in case the animal moves – I don’t want the catheter falling out. Once I’m happy that the catheter is placed correctly, I’ll finish taping.
Use another piece of tape to secure the catheter hub and port or giving set. Start by passing the tape under the injection port, wrapping around the leg and then over the catheter hub.
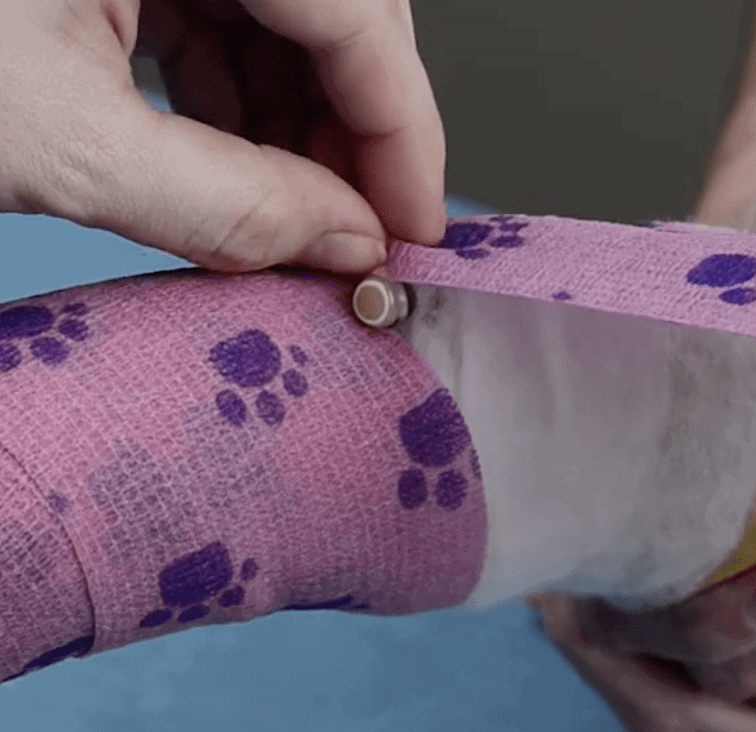
7. Protect the site
For a short-term (ie a day or so) catheter, I like to wrap the entire leg from the paw to above the catheter in orthopaedic padding, then red cohesive bandage. I always leave the injection port showing for quick access. Using a designated colour like red, signals to all other staff members that the patient has a catheter. This helps prevent accidental discharge with the catheter still in place.
How Long is Too Long?
An indwelling catheter can remain in place for as long as it is functional and no complications occur. Many practices will have a set time that each catheter is allowed to remain indwelling, e.g. 3 days.
Whilst this can be beneficial, it can lead to extra scarring from additional catheter placements in the veins when unnecessary, extra discomfort to the patient, and additional costs to the clinic and owners. One large human medicine study has indicated that there are no extra benefits of replacing catheters every 72 to 96 hours as a measure to reduce the risks such as phlebitis and bacteraemia6.
The catheter should be removed if it is no longer functional, if there is pain or resistance upon infusion, if there is unexplained fever, evidence of cellulitis, thrombophlebitis, or catheter-related bacteraemia or septicaemia.
INSTRUCTIONAL VIDEO – INTRAVENOUS CATHETER PLACEMENT FOR VETERINARY NURSES
References
- Catheters: a review of the selection, utilisation and complications of catheters for peripheral venous access. Tan RHH, Dart AJ, Dowling BA. Australian Veterinary Journal Volume 81, Issue 3, pages 136–139, March 2003
- The efficacy of chlorhexidine gluconate in canine skin preparation – practice survey and clinical trials. Evans LKM, Knowles TG, Werrett G, Holt PE. Journal of Small Animal Practice. Volume 50, Issue 9, pages 458–465, September 2009
- Surveillance of infections associated with intravenous catheters in dogs and cats in an intensive care unit. Marsh-Ng, M. L., Burney, D. P. & Garcia, J. Journal of the American Animal Hospital Association 2007: Vol 43, pgs. 13–20
- Bacterial and fungal colonisation of peripheral intravenous catheters in dogs and cats. Seguela J, Pages J-P. Journal of Small Animal Practice. Volume 52, Issue 10, pages 531–535, October 2011
- Effectiveness of transparent film dressing for peripheral intravenous catheter. Atay S, Yilmaz Kurt F. Journal of Vascular Access 2021. Volume 22, Issue 1, pages 135-140
- Clinically-indicated replacement versus routine replacement of peripheral venous catheters. Webster J, Osborne S, Rickard C, Hall J. Cochrane Database of Systematic Reviews 2010, Issue 3. Art. No.: CD007798.
want to learn more?
Fluid therapy
SHORT COURSE
Fluid therapy is an integral part of the modern veterinary clinic. This subject will teach students about the various fluids available, when to use them, and how to monitor patients receiving fluid therapy. Students will also learn about osmosis, and how to calculate correct fluid rates.
Delivered over 13 topics ranging from water and electrolyte balance in the body, to administration of fluids and monitoring your patients, this course will ensure you are well equipped to assist the veterinarians and provide excellent nursing care to all patients receiving fluid therapy.