
WRITTEN BY: HARRIE PHILLIPS
PGCertClinEd, BAdVocEd (VocEd&Trng), DipVN (Surgical, ECC), DipBus, DipTAE (Development & Design), TAA
PUBLISHED: 7 MARCH 2018
REVIEWED/ UPDATED: 16 OCT 2025

Blood smears are an easy internal pathology test to prepare. They are also often overlooked – sending in a blood smear to the external lab when made fresh, can provide better diagnostic information for the clinical pathologist.
When running a haematology analysis (including in-house) on a patient, it is recommended you also perform a blood smear. Blood smears are used to detect cell abnormalities and confirm the numbers provided by the analyser. The smear may also be sent to an external laboratory for a pathologist to assess, either by itself or in conjunction with an EDTA sample for them to run the haematology.
Using a beveled or ground edge slide as your spreader will give you a nicer film than using a cut edge slide.
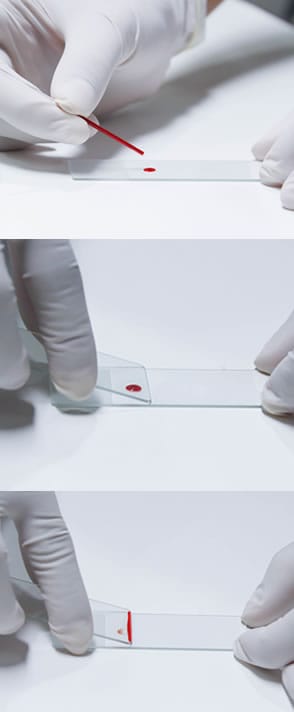
BLOOD SMeAR PROCEDURE
- Ensure that you use clean, dry microscope slides (only handle the slide by the sides).
- Label a slide with the patient name and ID at one end of the slide.
- Place a small drop of blood around 3mm in size (fresh or mixed with EDTA) at the labelled end of the slide. This drop can be acquired by using a haematocrit tube or with a small-gauge needle and a 1ml syringe.
- Holding the blood sample slide by the edges, keep it firmly on the bench. Use a clean spreader slide place the edge of this in the middle blood sample slide.
- Draw the spreader back into the drop of blood at an angle of 45 degrees and allow the blood to spread along the edge of the spreader. If your patient is anaemic, then increase the angle to get a thicker smear.
- Push the spreader away from the blood drop using a single, smooth motion.
- Ensure that the end of the film has a ‘feathered edge’.
- Let the film air-dry. Some clinics like to speed up the drying process with a hairdryer. If you do, ensure you only use a low temperature and hold 30cm away on the underside of the slide.
- If you are unsure of the quality, make a few then select the best.
- If examining the smear in-house, stain the slide after it dries. If the smear is being sent to the laboratory, allow it to dry and place it into a slide container (do not stain the slide).
TROUBLE SHOOTING YOUR SMEARS
SMEAR TOO SHORT
Try using a larger droplet of blood. You can also try decreasing the angle of your spreader slide and going a little slower.

SMEAR TOO THICK OR LONG
Try a smaller drop of blood for your next slide. You can also try increasing either the angle of your spreader, or move a little faster.

PAUSES OR HESITATION
It’s all about practice. You need to have a smooth action and keep the spreader slide edge in full contact for the entire movement.

TOO THIN
Firstly try using a larger drop of blood.
Failing that, increase the angle of your spreader side and/or decrease the speed at which you push it.

WAVES, RIDGES OR UNEVEN ENDS=
Ensure you are keeping your motion smooth and with the spreader slide in contact the whole time.
Try using a ground or bevel edge slide for the spreader slide,
not a cut edge. The cut edge slides can leave ridges and not run as smooth.
Try relaxing your wrist and use a little less pressure when pushing the spreader slide. A little faster could also help.

want to learn more?

CLINICAL PATHOLOGY
SHORT COURSE
This course will ensure you have a good knowledge of laboratory techniques commonly used in the veterinary clinic. You’ll be confident in knowing what equipment is used and how to maintain it including microscopes, refractometers, in-house lab machines, centrifuges etc. We also cover how to perform various pathology procedures urinalysis including sediment, PCV/TP, faecal floats, blood smears, and snap tests etc. The foundations of haematology and biochemistry are also covered, along with the importance of quality assurance procedures. Setting up and assisting with various centesis procedures is also included. Most importantly, you’ll learn about the correct handling and storage of samples to ensure accurate test results.
Check it out